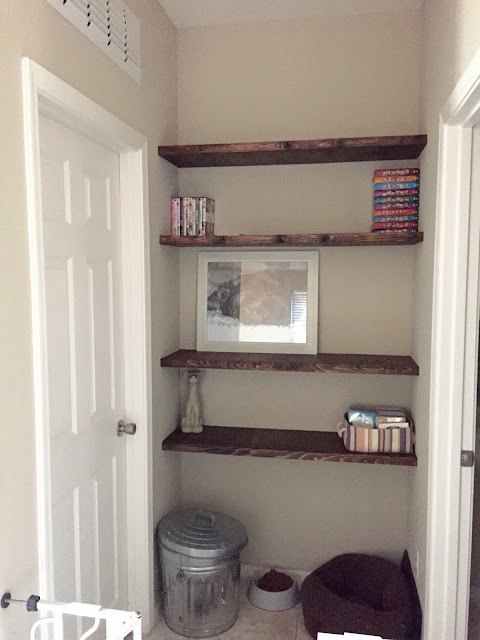
Do you ever look at a space in your house and ask "Why"? As in, why did whoever design my house put that there or include a space or not include cabinet knobs? Well, our new house has quite a few things on that list and we're slowly trying to figure out what to do to make those things work for us. The easiest to figure out and fix was a weird space/alcove between our master bedroom door (left) and the downstairs half bath door (right).
This spot has quickly become the dogs spot for food, water and where they hang out when we're not at home so I wanted to create a functional spot for them as well as some storage to deal with the copious number of boxes that are still not unpacked. I initially was going to try to find unit that fit the spot but I wanted to keep the floor space open to the dogs so instead, I decided to put in some floating shelves.
This was a bit of a fly by the seat of my pants project. I took some quick measurements of the alcove and headed to Lowe's. I wanted to keep this project simple and keep scrap to a minimum so I stuck with one 4' x 8' sheet of 1/4" stainable plywood and four 1x2's (8 ft long each). I had the guy at Lowe's cut down the plywood into eight 45" x 1' pieces and the strip left over I kept to make a smaller shelf. Then I headed home to work with the 1x2's.
I started on the table saw. I didn't want to see any raw plywood edges so I used the table saw to notch out a 1/4" deep notch on either side of two of the 1x2's. This allows the plywood to lay flush with the top of the 1x2 and have some support (1/2") underneath so I didn't have to used more 1x2's than necessary. The other 1x2's were ripped so that they would be the same depth as the narrow side of the notched 1x2 to create support pieces for the wall.
I used our miter saw to cut everything down to length. The scraps were cut down to create this smaller shelf for the bathroom. This only left a small piece of plywood at the end.
All the visible pieces of wood got a coat of stain and then it was time to start putting everything together.
Since 1x2's aren't very thick, I predrilled all the support pieces. This took a little extra time upfront but it saved a lot of frustration of splitting the wood so it was totally worth it.
Next was figuring out where to put the shelves. Our laser level has been my best friend in this house and it made this project so easy to put together. I set up the laser at the height I wanted the first shelf and started putting up support pieces right under it.
I would check with an actual level to verify that the individual support pieces were level and then I attached the front piece.
At this point I had support on all sides so I could lay in my top plywood piece and use my nail gun to attach the top to the supports. I repeated this process for the bottom piece of plywood and that finished the build of one shelf.
To keep going, I set up a tape measure with the spacing I wanted between the shelves and then lined the laser up to right above the top of the tape.
Lots of repeating work later, I had four awesome floating shelves! I was a little worried about the shelves sagging but these things are solid. I also shockingly did not have to repeat any cuts and things fit together just how they were supposed to (benefits of a newer house??? things are actually square??)
I wasn't quite done yet though. I touched up all the nail holes with stain and then put a coat of polyurethane on all visible sides.
I used a satin poly so you can barely tell a shine difference (above) between the poly'd and non poly'd side but after a quick sand down after the poly dried, The shelves were nice and smooth and no longer had the rough feel of plywood. I've learned over the years that if you ever want to wipe down these type of shelves, this is an absolutely necessary step.
Finally, I was able to do some unpacking and styling. All our DVD's and shows and CD's (yes we still use these things and we even use our LP's, I just couldn't find the box that they are hiding in to put them up yet) are now readily available and since this is the dogs area down below, I decided to use this space to display all our favorite pups in picture form.
I'm trying to embrace the desert life so we picked up a few dry loving plants this weekend and the little bit of greenery is definitely making me happy.
The only thing left to do is find an appropriate basket to store dog toys on the lowest shelf and then I'm going to be super duper happy with the combo of utility and eye candy that this little no-space has embraced.
How about you? Do you have a space in your house that needs defining?
Linking to: Remodelaholic.com


No comments:
Post a Comment